I've spent a couple hours to update the Big Zeus Family Similarity Rundown, now including almost twice as many samples.
First, I would like to thank Maciej Kotowicz and Dennis Schwarz for both their valuable input and contributions to the data from which this analysis was created.
The Rundown now includes 99 versions of 14 families (before: 52 versions of 10 families).
Thanks to many contributions in Malpedia, I was able to increase the coverage of PandaBanker massively. With the additions to VMZeus, their direct connection and code evolution now is way more obvious.
Here is a preview, but you probably want to check out the data on its dedicated page.
About a year ago, I
published
ApiScout,
a library
that allows the recovery of potentially used Windows API functions
from memory dumps.
The approach can be
outlined as checking all DOWRDs/QWORDs of a memory dump against a
previously created collection of DLL information for a given Windows
instance. It has been used in the recently published paper
on Malpedia,
where it was used to compare Windows API usage behavior of 382
malware families.
In this blog post, I
want to explain the additions to ApiScout that I have done together
with Steffen Enders, namely the introduction of ApiVectors.
ApiVectors are a compact representation of “interesting” API
functions extracted with ApiScout that can be used to get a first
impression of a malware's potential capabilities but may also serve
for matching against a reference database to aid in malware
identification.
ApiVectors
The output of
ApiScout is a list of tuples, consisting of the following elements:
offsets:
in the
buffer where a potential API address has been found
the
dword identified as DLL/API address
its membership in
the PE header's Import Table (if applicable)
an estimate how
many times it was referenced in the code
the found DLL / API
name
Here is a shortened
example result for a Citadel binary:
Example output of ApiScout for a dump of Citadel.
Naturally, we now
wanted to find a decent way to store this information, preferably in
a compact format that maintains as much relevant information as
possible.
In our previous work
on Malpedia we found that you encounter “only” around 4.000
unique APIs (out of 50k+ found in a Windows installation) across the
380 malware families, with very few being common (top150 APIs present
in ~25% of the families) and many being found in just few families
(90% of the APIs present in 10% or less of the families).
Of course, we could
easily use the full set of APIs as base vector but that would mean
super sparse vectors since we also found that on average, 120-150
APIs are found in a given malware family.
Because we wanted
this vector to carry information useful to analysts, we had a closer
look at the semantic context of the API functions. So we went ahead
and labeled ~3.000 of the API functions into the following 12 groups
(with counts per group):
584 GUI
392 Execution
353 String
312 System
278 Network
230 Filesystem
101 Device
088 Memory
073 Crypto
062 Registry
033 Other
022 Time
An immediate
observation is that there are many API functions related to GUI and
string handling that potentially are less interesting to an analyst,
the same holds true even within more relevant groups. Instead of
covering everything, our representation should definitely focus on
really meaningful suspicious aspects like interacting with the system
or network.
In our efforts for
reduction, we first apply some simplifications to Windows API names:
We drop the
string type, i.e. “A” or “W” if applicable
We ignore MSVCRT
versions, i.e. msvcrt80.dll!time becoming msvcrt.dll!time
Some quick
experiments showed that the information lost by this step is
negligible.
We then went ahead
and designed a custom vector of size 1024 that is roughly based 80%
on the occurrence frequency as found in our Malpedia evaluations and
20% based on domain knowledge of interesting API functions that
should definitely be included.
This leaves us with
the following result:
Result of crafting a 1024 bit vector by semantic groups
The vector we have
settled for can be found
here. Feedback welcome! :)
Visualization: ApiQR
One cool thing that
you can do with a vector of length 1024 is fitting it into a Hilbert
curve to achieve a nice way to visualize the information. The Hilbert curve ensures that neighboured entries appear next to each other, while also filling the given space. We call
these diagrams ApiQRs:
ApiQR representation: Hilbert curve for our 1024 bit ApiVector with the semantic categories
Here
are some example visualizations for a few families. You can also click them to have their vectors viewed in Malpedia:
You
may be interested how the above base64-like strings (e.g. for RockLoader: A8gAgAFAIA3gA7IA4EAACA7CQA4QA8QABA3EA6FAEA5CA3IA69BAEAABAABA10) are
constructed.
We actually use an alphabet of 74 printable (and hopefully not too
tool-conflicting) characters in a way that is actually very similar to base64.
Now,
take the following raw, uncompressed ApiVector of RockLoader shown above and the corresponding
encoding per 6 bit below each row:
000000000000000000000000000000000000000000000000
A A A A A A A A
100000000000100000000000000101000000001000000000
g A g A F A I A
000000000000100000000000000000000000000000000000
A A g A A A A A
000000000000001000000000000000000000000000000100
A A I A A A A E
000000000000000010000000000000000000000000000000
A A C A A A A A
000000000000000010010000000000000000000000000000
A A C Q A A A A
010000000000000000000000000000000000000000000000
Q A A A A A A A
000000010000000000000001000000000000000000000100
A Q A B A A A E
000000000000000000000000000000000000000101000000
A A A A A A F A
000100000000000000000000000000000000000010000000
E A A A A A C A
000000000000001000000000000000000000000000000000
A A I A A A A A
000000000000000000000000000000000000000000000000
A A A A A A A A
000000000000000000000000000000000000000000000000
A A A A A A A A
000000000000000000000000000000000000000000000000
A A A A A A A A
000000000000000000000000000000000000000000000000
A A A A A A A A
000000000000000000000000000000000000000000000000
A A A A A A A A
000000000000000000000000000000000000000000000000
A A A A A A A A
000000000000000000000000000000000000000000000000
A A A A A A A A
000000000000000000000000000000000000000000000000
A A A A A A A A
000001000000000100000000000000000001000000000000
B A E A A B A A
000001000000000000000000000000000000000000000000
B A A A A A A A
0000000000000000(00)
A A A
(Small remark:
Obviously we have to pad with 2 bit because 1024 % 6 == 2.)
Now,
one thing that is obvious is that vectors can be very sparse and we
can probably condense the representation further.
For
this we use runlength-encoding, with which we can remove the repetitive consecutive symbols, for which we freed up the 10
numbers from the original base64 alphabet before.
With
that, we can now “compress” the vector as follows.
Here are some statistics, taking malpedia as basis (1957 dumps for 637 distinct families):
Avg number of unique APIs per dump: 121.633 Avg number of APIs represented in ApiVector: 100.053 (82.258% coverage) Avg ApiVector length (compressed): 92.438 bytes
You
can easily incorporate ApiVectors into your own analysis
environment.
For starters, the
previous blog post on ApiScout explains how to build a DB custom to
your Windows system. After this, you can simply crawl arbitrary buffers (e.g. memory dumps of selected suspicious segments from processes) for their API information and have this available in your other analysis such as IDA Pro.
If you do not want to use ApiScout to crawl memory dumps, you can also create ApiVectors directly from a given list of Windows API functions (e.g. Import Tables) using getApiVectorFromApiList() and getApiVectorFromApiDict() from the ApiVector class respectively.
A concrete use case for ApiVectors is matching them against each other.
In that context, projects like ImpHash and ImpFuzzy may come to mind.
The advantage of ApiVectors is that they actually carry the identity of API functions used without abstracting them with only little higher cost in terms of required storage. We are currently looking to hook our approach up with sandboxing, e.g. Cuckoo.
Our current experiments indicate that using similarity of ApiVectors may in fact serve as a decent way to perform malware family identification.
As announced, we will cover this in a future blog post and full paper summarizing all of our findings around ApiScout.
Dear followers of this blog, I wish you a happy new year!
About a month ago, I have launched my latest project: Malpedia (slides here).
Since the launch, we have grown by about 350 users and have a stable average 10 proposals/contributions per day. I hope that Malpedia will become a really useful resource for malware research over time!
This blog shall serve as a demonstration for what you can use with this malware corpus.
Over the last couple days, I have taken all dumps for versions of Zeus-related families and created a similarity matrix for them, using IDA Pro and BinDiff.
It looks like this:
Screenshot of "The Big Zeus Family Similarity Showdown"
Because I want to update this document over time, I have descided to host it on a dedicated page over at pnx.tf instead of using this blog. Over there, you can find more info on the families included and the methodology I used in order to create it.
Here is a short post on what I found out about the "link" between Lazarus and WannaCry.
To me, the function referenced looks a lot like only a generator for a TLS 1.0 client hello.
On 2017-05-15 19:02 Neel Mehta tweeted the following:
Neel Mehta tweet, linking the samples of WannaCry and Lazarus / Contopee
Some more indicators for this claim that we look at Client Hellos is the usage in a function a bit up in the call chain:
Up the call stack, looking in which context the function / buffer is used.
Here our buffer generated by 0x402560 is send to localhost listening on typical TOR ports.
Maybe some part of the TOR communication capability (or adapter) was directly embedded in this earlier version of WannaCry?
Assessment:
While I agree that the compiled functions from both samples (A: WannaCry, B: Lazarus) originate very likely from the same source code and that they were compiled with similar tooling (there are some more indicators for this in how the generated code look likes, e.g. padding, thunks, ...), the exclusivity of the code defines the strength of the link.
This function provides a rather generic network-based
functionality (yet in a strongly specific way), so I would not be surprised if eventually the respective source code
appears as being publicly accessible in some corner of the wild and open Internet. In that case we could be looking at a super weird coincidence.
Hashes:
3e6de9e2baacf930949647c399818e7a2caea2626df6a468407854aaa515eed9 - WannaCry, February 2017
After hacking away for some days in the code chamber, I'm finally satisfied with the outcome and happy to announce the release of my new library: "ApiScout".
The main goal of ApiScout is to allow a faster migration from memory dumps to effective static analysis.
While reverse engineering "things" (especially malware), analysts often find themselves in a position where no API information is immediately available for use in IDA or other disassemblers.
This is pretty unfortunate, since API information is probably the single most useful feature for orientation in unknown binary code and a prime resource for recovery of meaning.
Usually, this information has to be recovered first: for example by rebuilding the PE ("clean unpacking", using ImpRec, Scylla, or similar) or by recording information about DLLs/APIs from the live process to be able to apply it later on (see Alex Hanel's blog post).
Both methods are potentially time-consuming and require manual effort to achieve their results. From my experience, clean unpacked files are often not even needed to conduct an efficient analysis of a target.
As I did a lot of dumping when reversing malware over the last years (and especially for malpedia - project outlook slides here), I craved for a more efficient solution.
Initially, I used a very hacky idapython script to "guess" imports in a given dump versus an offline DB - the limitations: 32bit and a single reference OS only.
After talking to some folks who liked the approach, I decided to refactor it properly and also integrate support for 64bit including ASLR.
To show the usefulness of this library, I have written both a command line tool and IDA plugin, which are explained in the remainder of this blog post.
First, let's have a look at a more or less common situation.
Executing it yields a very suspicious new svchost.exe process.
Running the Asprox sample results in a new suspicious scvhost.exe process.
Inspecting the memory of this new process reveals a not less suspicious memory section with RWX access rights and a decent size of 0x80000 bytes.
However, apparently the PE header got lost as can be seen on the left:
Looking closer at the process memory, we find a RWX segment @0x008D0000.
Luckily the import information is readily available:
Left (Hex view) /Right (Address view): Import Address Table (IAT) as found inside of the RWX segment.
With ImpRec or Scylla, we would now have to point to the correct IAT instead of using the handy IAT autosearch, because autosearch would identify the IAT of svchost.exe instead of Asprox' (see comparison left vs. right).
Left: Scylla IAT Autosearch gives IAT of svchost.exe, but we want ...
Right: IAT of Asprox - which we can't dump since PE header is missing.
But we now encounter another issue: Because there is no PE header available, Scylla fails to rebuild the binary and with that, the imports.
Granted, many injected memory sections will have more or less correct PE headers or we could write one from scratch...
But remember, I promised "painless" recovery in this blog post's title.
ApiScout: command-line mode
As I explained before, if we have all relevant API information available, we can directly locate IATs like the one of the above example.
So let's first build an API DB:
Running DatabaseBuilder.py to collect Windows API information from a running system.
While DatabaseBuilder.py is fully configurable, using Auto-Mode should yield good results already.
Next we can use the database to directly extract API information from our dump of memory section 0x008D0000:
Resultof running scout.py with the freshly build API DB against a memory dump of our injected Asprox.
Since this cmdline tool is just a demo for using the library, this should give you an idea of what can be achieved here.
For our example memory dump (76kb), I timed the full recovery (loading API DB, searching, shell output) on my system at about 0.3 seconds, so it's actually quite fast.
I am aware that this may occasionally lead to False Positives but there is also a filter option as a simple but effective measure: It requires that there is at least another identified API address within n bytes of neighbourhood - from my experience this is already enough to reduce the already very few FPs to an absolute minimum.
IDA ApiScout: fast-tracking import recovery
In this section, I want to showcase the beautified version of my old hacky script.
I assume it can be similarly adapted for others disassemblers like radare2, Hopper, or BinaryNinja.
Loading ida_scout.py as a script in IDA shows the following dialog in which an appropriate API DB can be selected.
Note that imports are not resolved as we loaded the memory as a binary (not PE) at fixed offset 0x008D0000:
ida_scout.py shows the available API DBs or can be used to load a DB from another place.
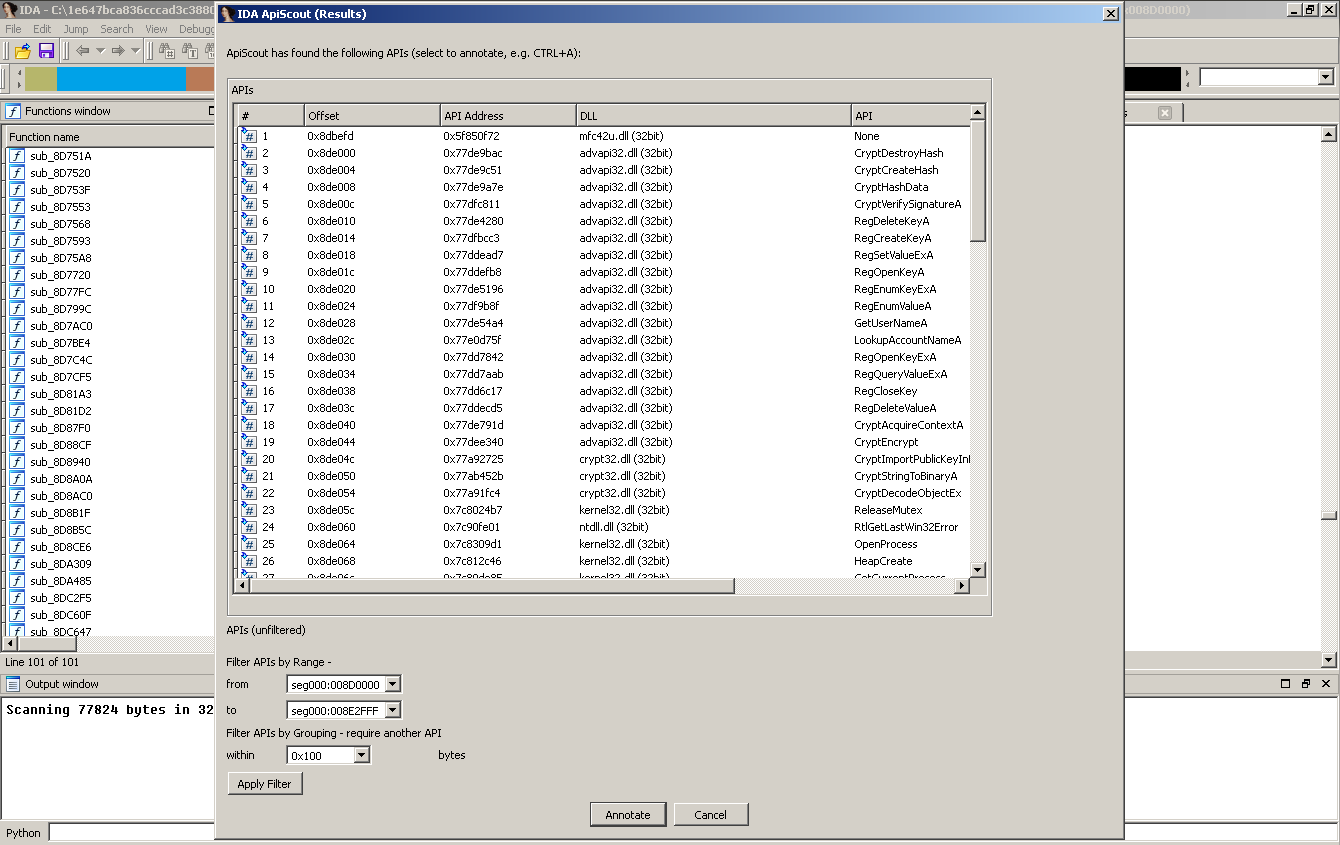
Executing the search with the WinXP profile from which Asprox was dumped, we now get a preview of the APIs that can be annotated:
Selection/Filter step of identified API candidates.
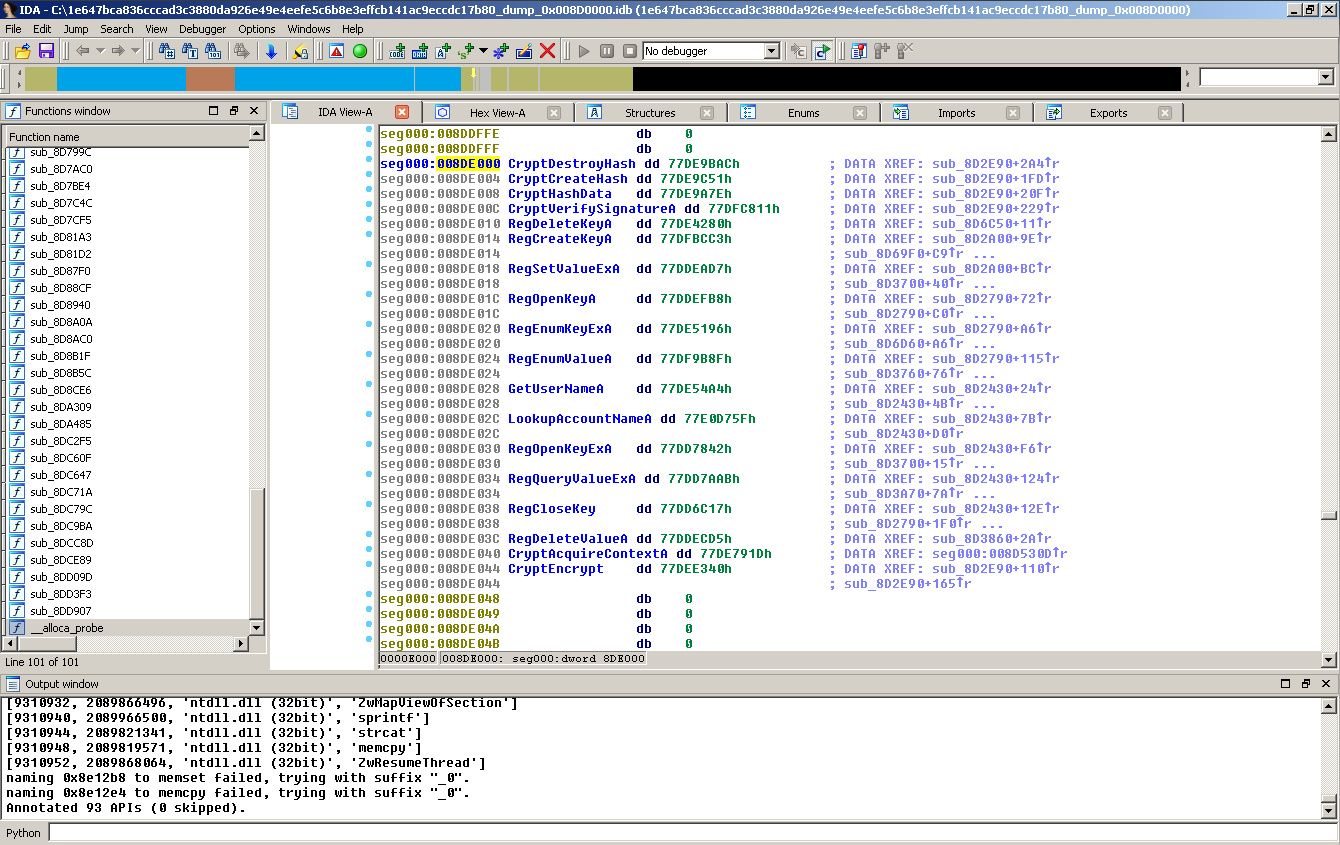
Aaaaand here we go, annotated API information:
Yay, annotated offsets in IDA as if we had a proper import table!
And yes, it's just as fast as it seems, clicking through both windows and having API information ready to go took less than 10 seconds.
That's what I call painless. :)
Dealing with ASLR
For simplicity's sake the above example was executed on WinXP 32bit, with no ASLR available.
However, it works just as fine for more recent versions (I use Windows 7 64bit), both for 64bit dumps or 32bit compatibility mode dumps.
In case you haven't disabled ASLR on your reference system, this section explains how ASLR offsets are obtained for all DLLs that are later stored in the DB.
I will skip explaining ASLR in detail, but feel free to read up on it, e.g. this report by Symantec.
The first step of DLL discovery is identical to non-ASLR systems and performed by DatabaseBuilder.py.
At the end of the crawling process (which involves collecting the ImageBase addresses as stated in the PE headers of all DLLs), we perform a heuristic check if ASLR is activated: We obtain a handle (which equals the in-memory BaseAddress) to three DLLs (user32.dll, kernel32.dll, and ntdll.dll) via GetModuleHandle() and check if the respective corresponding file as identified with GetModuleFileName() shows an identical ImageBase. If at least one DLL differs, we assume ASLR is active.
Since every DLL receives a individual ASLR offset, we will have to make sure that every DLL of interest has been loaded at least once.
For this purpose, I wrote a little helper binary "DllBaseChecker[32|64].exe" which simply performs a LoadLibrary() on a given DLL path and returns the load address.
Iterating through all DLLs identified in the discovery step, we are now able to determine each individual ASLR offset by subtracting file ImageBase and load address.
Closing Note
While this approach probably is certainly no magic or rocket science, I haven't seen it published in this form elsewhere yet. At least to me, it provides great convenience in several ways and I hope that one or the other can benefit from it as well.
For future use, I imagine it being used manually as shown in the post or potentially in automated analysis post-processing chains, where this functionality may come in handy.
I have to admit that I misjudged the effort to do code this in a nice way (by about a week of release-time) but I want to thank @herrcore for motivating me to rewrite and release it and @_jsoo_ for pushing me to address ASLR properly with the initial release version.
After some abstinence, I thought it might be a good idea to write something again. The perfect occasion came yesterday when I decided to build myself a new VM base image to be used for future malware analysis.
In that sense, this post is not immediately a tutorial for setting up a hardened virtual machine as there are so many other great resources for this already (see VM Creation). Maybe there is a good hint or two for you readers in here but it's mostly a write-up driven by my personal experience.
The main idea of this post is to outline some pitfalls I ran into yesterday, when relying on said resources. To have others avoid the same mistakes, I hope this post will fulfil its putpose.
In total I spent about 5 hours, 2 hours for setup and probably another 3 hours for testing but more about that later. This could have easily been only one hour or less if I knew everything I'll write down here beforehand. So here you go. :)
The remainder of this post is structured as follows:
Before starting out, it's good to know and plan where we are heading.
My Needs: I'm mostly interested in doing some rapid unpacking/dumping to feed my static analysis toolchain and then occasional do some debugging of malware to speed up my reasoning of selected code areas.
For this, I wanted a new base VM image that is able to run as much malware natively as possible, without me having to worry about Anti-Analysis methods.
Potentially, I want to deploy this image later as well for automation.
I don't aim for a perfect solution (perfection is the enemy of efficiency) but a reasonably good one.
OS choice: Windows 7 is still the most popular OS it seems, but since 64bit malware is getting more popular, we should take that into concern as well. So I go with Win7 x64 SP1 as base operating system.
Why not Win10: Well, I want a convenient way to disable ASLR and NX globbaly to allow my malware&exploits to flourish. Since I don't know if it's as easy in Win10 as it is in Win7, I stick with what I know for now.
Since I wanted to understand all the steps, I took VMCloak only for theoretical background. VBoxHardenedLoader is targeting a Win7 x64 as host system, however I use Ubuntu 16.04 with VirtualBox 5.0.24 so this wasn't immediately usable as well. But it's another excellent theoretical background resource.
Ultimately I ended up using antivmdetection as base for my endeavour.
Since I trial&error'd myself through the usage (in retrospect: I should do more RTFM and less fanatic doing), here's a summary of things you want to do before starting:
1) Download VolumeID (for x64)
2) Download DevManView (for x64)
3) # apt-get install acpidump (used by Python Script to fetch your system's parameters)
4) # apt-get install libcdio-utils (contains "cd-drive", used to read these params)
5) # apt-get install python-dmidecode (the pip-version of dmidecode is incompatible and useless for our purpose, so fetch the right one)
6) $ git clone https://github.com/nsmfoo/antivmdetection.git
7) $ cd antivmdetection :)
8) $ echo "some-username" > user.lst (with your desired in-VM username(s))
9) $ echo "some-computername" > computer.lst
First, I simply created a new empty Win7 x64 VM.
I used the following specs:
* CPU: 2 cores
* RAM: 4 GB
* HDD: 120 GB
* VT-x activated (needed for x64)
* GPU: 64 MB RAM (no acceleration)
* NIC: 1x Host-Only adapter (we don't want Internet connectivity right away or Windows may develop the idea of updating itself)
Important: Before mounting the Windows ISO, now is the time to use antivmdetection.py.
It will create 2 shell scripts:
1) <DmiSystemProduct>.sh <- Script to be used from outside the VM
2) <DmiSystemProduct>.ps1 <- Script to be used from inside the VM post installation
Run Antivmdetection (outside VM): For me <DmiSystemProduct> resulted in "AllSeries" because I run an ASUS board.
Okay, next step: execute <DmiSystemProduct>.sh - For me, this immediately resulted in a VM I could not start. Responsible for this were the 3 entries
1) DmiBIOSVersion
2) DmiBoardAssetTag
3) DmiBoardLocInChass
Which were set by <DmiSystemProduct>.sh to an integer value and VirtualBox was pretty unhappy with that fact, expecting a string. Changing these to random strings fixed the issue though. So this may be one of the pitfalls you may run into when using the tool. Setting the ACPI CustomTable however worked fine.
Now we have a fresh Windows 7 installation, time to mess it up.
Windows Configuration: Here are some steps to consider that may depend on personal taste.
1) Deactivate Windows Defender - Yes. Because. Malware.
2) Deactivate Windows Updates - We want to keep our system DLL versions fixed to be able to statically infer imported APIs later on.
3) Deactivate ASLR - We don't want our system DLL import addresses randomized later on. Basically, just create the following registry key (Credit to Ulbright's Blog):
[HKEY_LOCAL_MACHINE\SYSTEM\CurrentControlSet\Control\Session Manager\Memory Management] - “MoveImages”=dword:00000000
4) Deactivate NX - Whatever may help our malware to run... Basically, just run this in Windows command line (again Credit to Ulbright's Blog):
bcdedit.exe /set {current} nx AlwaysOff
5) Allow execution of powershell scripts - Enter a powershell and run:
> Set-ExecutionPolicy Unrestricted
Run Antivmdetection (in VM): Now we are good to execute the second script <DmiSystemProduct>.ps1.
Some of its benefits:
* ensure our registry looks clean
* remove the VirtualBox VGA device
* modify our ProductKey and VolumeID
* change the user and computer name
* create and delete a bunch of random files to make the system appear more "used".
* associate media files with Windows Media Player
* clean itself up and reboot.
I fiddled a bit with the powershell script to customize it further. Also, after reboot, I removed the file manipulation and reboot code itself to be able to run it whenever I need to after deploying my VM to new environments (additionally, this reduces the runtime from several minutes to <5sec).
Dependencies: Because malware and packers often require Visual C and NET runtimes, we install them as well. I used:
* MSVCRT 2005 x86 and x64
* MSVCRT 2008 x86 and x64
* MSVCRT 2010 x86 and x64
* MSVCRT 2012 x86 and x64
* MSVCRT 2013 x86 and x64
* MSVCRT 2015 x86 and x64
* MS.NET 4.5.2
Snapshot time! I decided to pack my VM now into an OVA to archive it and make it available for future use.
Now feel free to inflict further harm to your fresh VM.
Installing MS Office, Adobe Acrobat, Flash, Chrome, Firefox all come to mind.
Certainly DO NOT install VBoxGuestAdditions. The only benefits are better adaption of screen resolution and easy shared folders. For shared folders you can also just check out impacket's smbserver.py which gives you about the same utility with a one-liner from your host shell.
PAfish looking good:
Very good yet not perfect result. We happily ignore the VM exit technique.
This is no longer an issue when updating to VirtualBox version 5.1.4+, read below.
As initially mentioned, I spent another 3 hours with optimization and trying to get rid of the hypervisor detection.
Note that modifying the HostCPUID via VBoxManage does not fix the identity of VirtualBox which I basically learned the hard way.
Paravirtualization settings: VirtualBox allows you to choose a paravirtualization profile. They expose different combinations of hypervisor bit (HVB) and Hypervisor Vendor Leaf Name (HVN):
1) none (HVB=0, HVN="VBoxVBoxVBox")
2) default (HVB=1 HVN="VBoxVBoxVBox" but can be modified by patching /usr/lib/virtualbox/VBoxVMM.so as shown above, where we have "vbvbvbvbvbvb" instead)
3) legacy (HVB=0, HVN="VBoxVBoxVBox")
4) minimal (HVB=1, HVN="VBoxVBoxVBox")
5) Hyper-V (HVB=0, HVN="VBoxVBoxVBox" but this can also be modified like default mode)
6) KVM (HVB=0, HVN="KVMKVMKVMKVM")
I will probably spent some more time trying to figure out where the "VBoxVBoxVBox" string is exactly coming from (could not find it in other virtualbox binaries, nor in the src used by DKMS to build vboxdrv) and think it can be ultimately binary patched as well.
However, the issue itself is tied to my setup of VirtualBox, otherwise, I'm pretty sure that my VM itself is looking rather solid now in terms of anti-analysis detection, so we can conclude this write-up.
UPDATE 2017-02-06: nsmfoo suggested upgrading to VirtualBox 5.1.4+ to get rid of the hypervisor detection.
So I took his advice, moved up to VirtualBox version 5.1.14 (using this guide and this fix) and he was absolutely right:
This post ended up being a walkthrough of how I spent my last Saturday afternoon and evening.
I found nsmfoo's tool antivmdetection super useful but sadly ran into some initial trouble that cost me some time. Ultimately I ended up with a VM I am very happy with, although there remains an issue of VirtualBox's Hypervisor identification.
I wrote this post while listening through Infected Mushroom's new album "Return to the Sauce" which I can also heavily recommend. :)
In the other blog post on Fobber, I have demonstrated how to batch decrypt function code, which left us with IDA recognizing a fair amount of code opposed to only a handful of functions:
After function decryption, IDA recognizes some code already.
However, we can see that there is still a lot of "red" remaining, meaning that functions have not been recognized as nicely as we would like it.
The reason for this is that Fobber uses another technique which we might call "inline string decryption".
It looks like this:
Fobber inline calls at 0x950326 and 0x950345, pushing the crypted string address to the stack which is then consumed as argument by decryptString()
We can see two calls to decryptString(), and both of them are preceded by a collection of bytes prior to which a call happens that seemingly "jumps" over them.
The effect of a call is that it pushes its return address to the stack - in our case resulting in the absolute address of the encrypted string directly following this call being pushed to the stack. From a coder's perspective, this "calling over the encrypted string" is an elegant way to save a couple bytes, while from an analysts perspective, this really screws with IDA. :)
Let's look at how the strings are decrypted:
Fobber's string decryption function.
Again, the rather simple single-byte xor-loop jumps the eye.
However, the interesting part is how parameters are loaded.
Thus, let me explain the effects of instructions one-by-one:
[...] mov edi, [ebp+0Ch] | move pointer where decrypted string will be put to EDI mov esi, [ebp+8] | move pointer of encrypted string to ESI lodsw | load two bytes (word) from ESI movzx ecx, al | put the lower byte into ecx and zero extend -> this is our len lodsb | load another byte from ESI (first byte of encrypted string) xor al, ah | xor string byte with upper byte loaded by lodsw (our key) xor al, cl | xor string byte with number of remaining chars (CL) stosb | store decrypted byte loop loc_953878 | decrement ECX and repeat as long as >0. [...]
Running this as exmaple for the first encrypted string as shown in the first picture: crypted string len | key | | remaining len | | 07 06 05 04 03 02 01 07 B2 C0 C6 DB DB DE DE B3 xor key (B2) -- -- 72 74 69 69 6c 6c 01 xor remaining len -- -- 75 72 6c 6d 6f 6e 00 ASCII -- -- u r l m o n -- So the first decrypted string here resolves nicely to "urlmon". Let's automate for all strings again.
Decrypt All The Strings
First, we locate the string decryption function. This time we can use regex r"\xE8....\x55\x89\xe5\x60.{8,16}\x30.\x30" which again gives a unique hit. This time, we first locate all calls to this function, like in the post on function decryption. For this we can use the regex r"\xE8" again to find all potential "call rel_offset" instructions.
We apply the same address math and check if the call destination
(calculated as: image_base + call_origin + relative_call_offset + 5) is
equal to the address of our string decryption function.
In this case, we can store the call_origin as a candidate for string decryption.
Next, we run again over all calls and check if a call to one of these string decryption candidates happens - this is very likely one of the "calling over encrypted strings" locations as explained earlier. This could probably have been solved differently but it worked for me.
Next we extract and decrypt the string, then patch it again in the binary.
I also change the "call over encrypted string" to a jump (first byte 0xE8->0xE9) because IDA likes this more and will not create wrongly detected functions later on.